Setting up a camping tent can be a daunting task, especially for first-timers. However, with a few helpful tips, you can set up your tent like a pro. First, choose a level and clear site to pitch your tent. Next, lay out your tent and assemble all its components before staking it to the ground. Use guylines and stakes to secure your tent against wind and rain. Finally, make sure to properly ventilate your tent to prevent condensation. With these tips, you’ll be able to set up your camping tent like a pro in no time.
Pick a Good Location
One of the most important things you can do before putting up your tent is to pick a good location. That can mean the difference between a comfortable night of sleep and one where your head pricks with every movement of your body and your tent mates.
Ideally, you want somewhere relatively flat and large enough for the tent footprint to fit comfortably, especially if it’s going to be filled with people – unless you have really specialized gear that can accommodate lots of folks (and their stuff) in a smaller space). It’s also best to avoid places that are too low, as they may flood during heavy rains, and if you’re camping in summer, look for a shady site where breezes can cool you.
You’ll also want to scan the area around your tent for easily movable hard objects like rocks, sticks, and pine cones that could poke through the fabric of the tent or puncture sleeping pads. Those can be a real pain when you’re dragging yourself out of bed at the end of the day to go back for another round of sleep.
And finally, you’ll want to consider the potential for lightning strikes if thunderstorms are in the forecast. Avoid camp spots on mountaintops, in open areas, or near tall lone trees, as they’re more likely to be targeted for lightning. On the other hand, sheltered spots partway down a slope can offer protection from these lightning bolts, while still being less exposed than higher ground. If you’re concerned about lightning, bring a waterproof tent cover to keep the inside of your tent dry.
Stake Out the Tent
Tents need to be staked out for stability. If the wind gets strong enough your tent will float, or even worse – it could blow away completely. This is why it’s important to use the included guy lines as well as stake out all corners of your tent.
Staking a tent sounds simple in theory, but there are always obstacles like a big rock exactly where your stake should go, loose ground, too-hard ground, and especially when camping on sand or snow. Fortunately, there are tricks to getting the job done regardless of your campsite conditions.
For instance, instead of trying to stomp your stakes in with your foot (which may or not result in a bruised palm and bent tent pegs), you can use a rubber mallet, hammer, or hatchet. This will reduce the uneven pressure on your stake and ensure it goes in at a straight angle for maximum holding power.
Another tip is to use longer, wedged tent stakes when camping on sandy soil. These are more effective than short, standard stakes because they have a larger cross-section to resist the force of the wind and can be driven in at a 60-degree angle to further increase the holding power.
When you are camping on sand or snow, you need to make sure your tent is stable and secure. Standard stakes may not be enough to hold your tent in place in these conditions. That’s why you should use shepherd’s hooks that can fit between the rocks and get deeper into the ground. You can find these hooks and other camping accessories at a discounted price with a Sports & Outdoors Promo Code. You should also add extra stakes on the opposite side of your tent to prevent it from pulling out of the ground in strong winds. Another tip to make your camping easier is to tie a loop at the end of your guy lines and pass an extra cord through it. This is called a girth hitch and it makes tying your lines faster and simpler, especially in cold weather. With these tips and a Saving Gain Promo Code, you can enjoy your camping trip without worrying about your tent.
Thread the Poles
Poles run through or around the tent structure and, depending on the design of the tent, can be located either on the inside or outside of the fabric. Those located on the inside are usually held in place by plastic clips and fabric pole sleeves; those on the outside are attached to the structure via hook and loop style straps, or snap into sockets on the end of the pole. These sockets are often color-coded, so it is easy to identify which pole goes where when the tent is erected.
Some tents have a vestibule – a floorless section of the tent that extends from one or both sides of the entrance. These are useful for the storage of equipment and boots, but can also be used to shield the sleeping area from moisture and wind coming from the outside. A vestibule is particularly important for extended-season or four-season tents, which have walls and roof heights suited to high-elevation conditions.
Most tents have a roof covering that is either nylon or polyester, with the latter usually coated in silicone, polyether urethane (PU), or a combination of these materials. Nylon is supple and flexible, but can easily tear in wet weather, while polyester is stiffer and less supple, but resists stretching and absorbs water very little. The choice of which to use is a matter of personal preference, but those who spend most of their camping time outdoors may find the extra waterproofing offered by polyester worth the tradeoff in flexibility and weight.
Some tents, such as the Kelty Discovery Element 6, have poles that are made of flexible fiberglass rather than aluminum. While this keeps the cost down, these poles are not as strong and durable as aluminum poles. They are also more fragile, and if stressed too much they can break in multiple places. To avoid this, they should only be handled by those with experience using them.
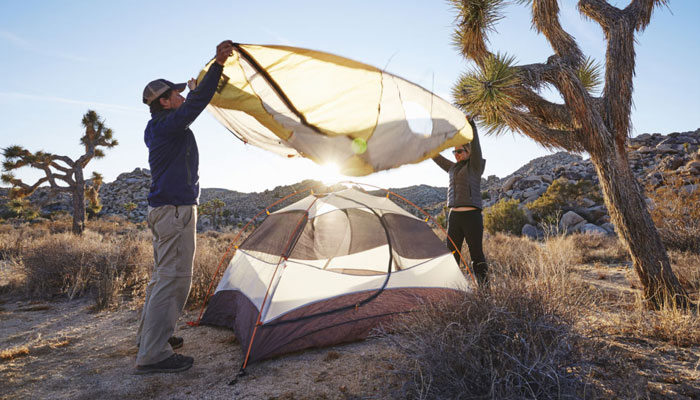
Tighten the Fly
Many tents use a rain fly to keep water from collecting in the inner tent and to provide some extra coverage for changing clothes and other tasks. It’s important to make sure the fly is snug and not touching the tent body; this keeps both dry, especially in wet conditions.
To do this, first set up the center and door poles (assuming you haven’t already done so). Then drape the fly cover over the tent and cinch it taut using the guy line ropes. Make sure the metal grommet hole of the fly cover is aligned with the tent body and that the Life in Tents patch is facing up (the topmost corner of the tent).
If you are camping in a windy situation, take care not to blow the fly off or let it touch the tent. This will create a gap that moisture can flow through during sideways rain and may result in leaks. If you notice this happening, inspect the tent and reposition it if necessary to minimize airflow through this gap.
If you want to buy a high-quality tent for your outdoor adventures, you need to know what materials are used to make it. Most tents are made of nylon and polyester, which are both waterproof fabrics. However, they have different properties and advantages. Nylon is more resistant to wear and tear and can stretch, while polyester is less elastic and absorbs moisture, making it more prone to ripping. That’s why polyester is often coated with silicone, polyether urethane, or polyether silnylon to make it stronger and more durable. These coatings also reduce friction and prevent tears. You can find tents that use these materials and coatings at White Duck Outdoors, a leading online store for camping and outdoor gear. You can also save money on your purchase by using a White Duck Outdoors Discount Code. With White Duck Outdoors, you can get the best tent for your needs at an affordable price.
In addition to providing protection from the elements, a well-tightened tent fly helps mitigate condensation buildup by improving ventilation and keeping excess water vapor away from your head/feet. It’s important to check and re-tighten the fly before a storm, as it will pull tighter and shed rainwater more effectively than a loose one. It’s also worth noting that the rainfly should be positioned a bit higher than the peak of the tent to ensure it can shed rainwater and help prevent it from pooling on the fly or the tent.
Put Up the Tent
Before pitching the tent, take a look at all your supplies to make sure you have everything. Check your tent poles and stakes for damage, and that you have enough to secure the shelter in strong winds or bad weather. It’s also a good idea to set up the tent in your backyard or living room before camping to familiarize yourself with the process and to ensure that you have all of the required components.
Start by finding a spot for the tent and clearing it of rocks, sticks, and other debris. Examine the ground, and if necessary, lay down a tarp that is slightly smaller than the footprint of your tent. This will prevent water from pooling underneath it in case it rains.
Once you have a flat area for the tent, set it up by laying it out and accounting for all of its components. Position the door and windows in the direction you want them to face, and consider the peak height of the tent — a taller tent will allow campers to stand up, which may be important for some people.
When the tent is in place, begin connecting its poles. Depending on the design of your tent, the poles may connect with bungee ropes, plastic hooks, or clips. Follow the directions for your particular tent to connect these.
Once the tent is complete, it’s a good idea to attach guylines to strategic points around the rain fly. These are useful in high winds and bad weather, and they help prevent the fly from blowing off or getting flapping in the breeze. If your tent has these, simply run a piece of cord out from the corresponding tent corner to a stake that is well away from the pole and make sure the line is taut.
Conclusion
Setting up your camping tent like a pro requires attention to detail, preparation, and practice. Remember to choose a suitable location, check the weather forecast, and bring all necessary equipment. Follow the instructions carefully and take your time to ensure a secure and comfortable setup. With these essential tips, you’ll be able to enjoy your camping experience to the fullest.