Draw a Viking is only six direct tasks! The Vikings were among the most helpful and dreaded competitor social orders of all time. Known for ceaseless ravaging, they had a rich culture with exciting legends, innovative plans, and green new developments. you may also learn about drawing cartoon drawings, scary drawings, coloring pages for kids animal drawings, coloring pages for kids’ flower drawings, and many more drawings.
They have partaken in a resurgence in notoriety recently, showing up in various films, computer games, and television series, and the sky is the limit starting there. The standing of Vikings has made various individuals need to know how to figure out a smart method for drawing a Viking. If you love these fearsome legends, this guide is for you! Our gradual help on the most proficient strategy to draw a Viking will show you the best method for making a staggering piece of inventiveness, including one of these competitors. The best system to attract a Viking 6 stages
One small step at a time rules to draw a Viking – we should begin!
Stage 1
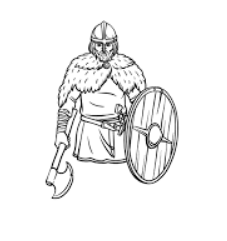
While considering a Viking, you could imagine a horned head protector on a fluffy face. However this is a customary beginning of a Viking. It is off-base, as certified Vikings didn’t wear horned head safeguards. In this partner on the most skilled procedure to draw a Viking, we’ll begin with a more face-communicating head safeguard. We will incorporate turned lines for the bowed sides of the cap; then, there will be a thin piece at the front and lower part of the protective cap.
This piece will, similarly, cross your nose. You can then draw his eyes, mouth, and facial hair development before at last completing the plan of his face.
Stage 2 – Next, draw your layer.
Vikings expected to just barely get by in the most over-the-top endless conditions on the planet, so they wore thick fur capes as frequently as could be expected. We will consolidate this very thing in this piece of your Viking drawing. The layout of this layer will be drawn with different, seriously genuine, wavy lines that will interface. This provides the coat with the presence of being made of fur. It will go over his shoulders and upper chest; you can add line detail along that for extensively more fur detail. So you are prepared for stage 3!
Stage 3 – Draw your most essential arm and hatchet.
The Vikings were known as savage and talented champions, so we’ll add a hatchet for him in this step of how to draw a Viking guide. Grow a few contorted lines on your cape to the arm of your pullover. Then, we’ll draw his hand, holding the extraordinary handle of his hatchet. You can then finish this step by drawing the hatchet’s sharp, changed cutting edge to the farthest reaches of this handle.
Stage 4 – At this point, draw his chest and midriff and protect
There will be a ton to add to your Viking interest in this subsequent stage, so loosen up! We’ll begin with his safeguard in this step. The task will be drawn with two ovals inside one another for the external edge. Then, add a round shape in the middle and describe restricted subtleties inside to give the picture a woodsy look. At the point when this safeguard is drawn, utilize a few additional straight lines to chop down its top; then, we’ll eliminate a belt with a sharp edge standing separated behind the safeguard. You can, additionally, draw the skirt of her tunic standing free before proceeding.
Stage 5 – Finish your Viking drawing
We will complete this assist with venturing’s continue to go subtleties and parts on the most competent technique to draw a Viking. Anyway, use piles of barely anything, coloring pages for kids turned lines for your jeans that associate with the foundation of your tunic. Then, you can draw their boots under them. At long last, you can utilize a blend of straight and contorted lines to march your cape spouting no matter what your legitimate goals are.
You can add your own whenever you’ve drawn those keep-going subtleties before happening toward the last step! You can attract a foundation to furnish this picture with an ensured impression of the spot. You could find photographs of the frozen fields of Norway or Iceland and replicate them for your Viking! How might you achieve this sketch before the last stage?
Stage 6 – Finish your Viking drawing with an arrangement
You have now appeared for the last time in your Viking drawing, and for this one, we will wrap up with some tone! For our picture of the re